| Bookmark Name | Actions |
|---|
Manage Customer Roles
All customers or members of the bank or credit union have varied level of privileges depending on the products and accounts owned with the bank, their net worth, and other parameters. Roles in Spotlight define the set of customers or members that the bank or credit union may want to categorize based on these factors. In case of business banking, the various employees of the company may have several roles such as administrator, authorizer, viewer and more.
Spotlight allows the banks or credit unions to define various services for the banking applications. More information on these services are available here. When these services are assigned to a role with the various configurations enabled, they become the role's permissions. These permissions define what kind of access/view will the members of the roles experience in their banking apps. A customer can have various roles. The permissions available to customers is a summation of the services available to all the roles that they are added to. Appropriate conflict management for permissions has been implemented to handle the various scenarios that may arise if a customer belongs to more than one role.
Every customer using digital banking applications must be associated with a role to inherit appropriate permissions and services. Roles should ideally be defined during the first-time set up of Spotlight and digital banking app set up.
As described in Features, the services have transaction limits associated with them. When a service is assigned to a role as permission, the administrator can choose to retain the default service limit values or change them to a value less than what is set for that service. A permission's limit can never exceed what is prescribed for the bank or credit union at a service level. It is also possible to assign a permission to an individual customer. In case a customer belongs to multiple roles, the highest limit described in any of these roles will be applicable for the customer. In case an individual limit is also available for the customer, this limit will always take precedence over role limits. However, the individual limit can never exceed the service limit defined for the bank or credit union.
For example, if a customer has a daily fund transfer limit of $100 by the function of role A and $150 by role B, whose allowed limit will be considered to be $150. However, if the admin assigns the customer a limit of $200 when the customer placed a special request with the bank, the customer's limit will be considered to be $200 even though others in the same role will have a limit of $150.
The Spotlight application has some basic roles defined out-of-the-box but they can easily be updated or deleted without any major impact on the application.
Use this feature to add and manage roles. Users can manage the customers by grouping them within these roles.
Menu path: Customer Management > Customer Roles
The application displays a list of active and inactive roles. You can do the following:
- View the list of active and inactive roles.
- Add roles and assign customers and permissions.
- View the details of a role.
- Edit the role details.
- Search for a role.
- Change the role status (activate or deactivate).
NOTE: If you do not see any list on the home page, it means that the roles are yet to be added.
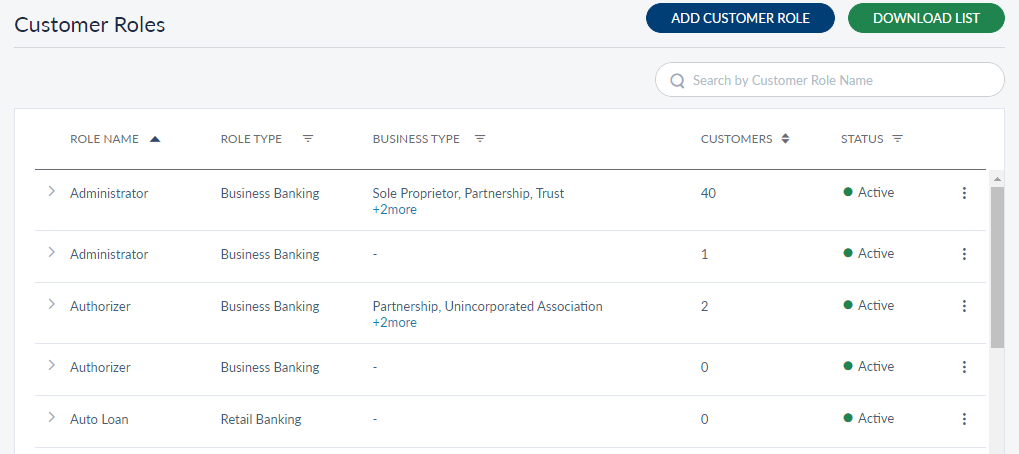
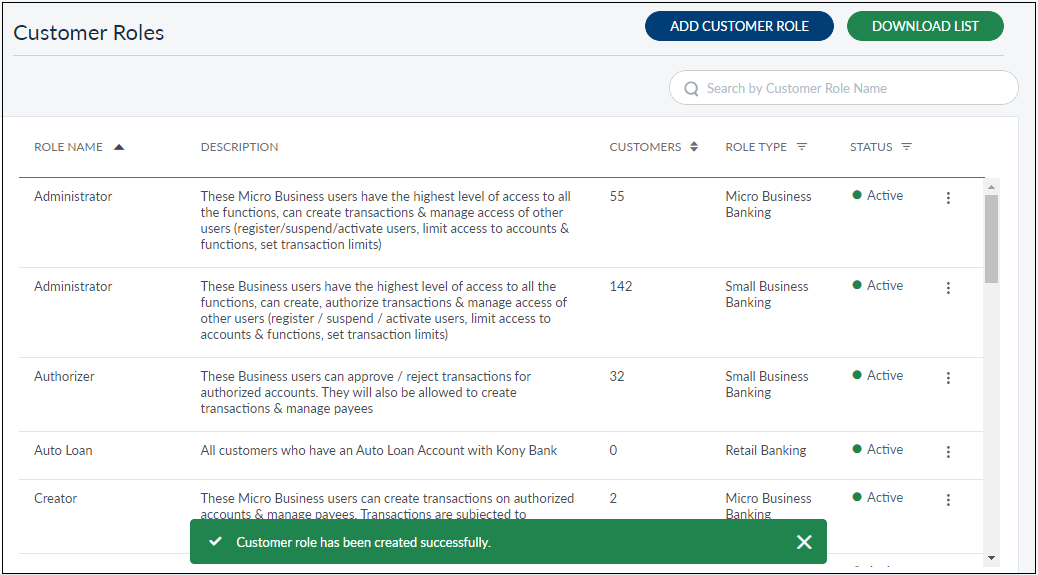
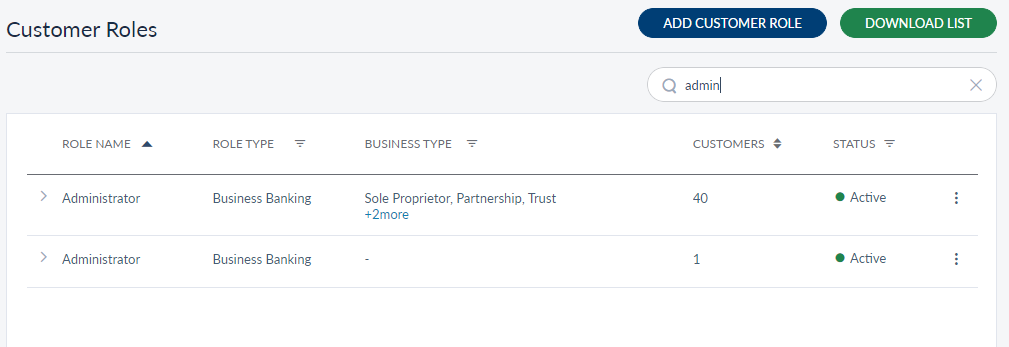
View Customer Roles List

The application displays the list of active and inactive customer roles.
Menu path: Customer Management > Customer Roles
The roles list is represented as rows with the following details:
- Name of the role.
- Role Type.
- Business Type - If the Role Type is Business Banking, then this section displays the associated Business Type(s) to which this role is applicable.
- Number of Customers assigned to the role.
- Status - Active or Inactive.
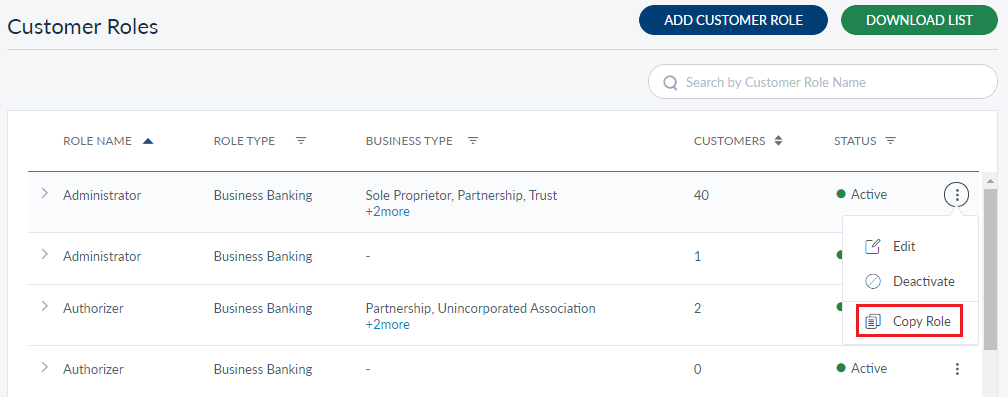
- Contextual menu
 to update customer role, deactivate and copy a role, as required.
You can sort the list based on any of the columns by using the sort icon (
 denotes sorted by that column). You can also filter the list by Role type (Business Banking or Retail Banking), Business Type and Status (active or inactive).
You can do the following:
- Click Add Customer Role to add a role.
- Click a role record to view the role details.
- Click Download List to download the list of existing roles as a CSV file.
- Click the contextual menu available on each row to open and do the following. Click the same again to close the menu:
- Assign customer permissions or customers to the role.
- Edit the details of a role.
- Update the role status based on the current status.
- Copy a role
- Search for a role using the search field and search criteria.
Add a Customer Role
Use the feature to add a customer role and assign associated customers and permissions.
Menu path: Customer Management > Customer Roles > Add Customer Role
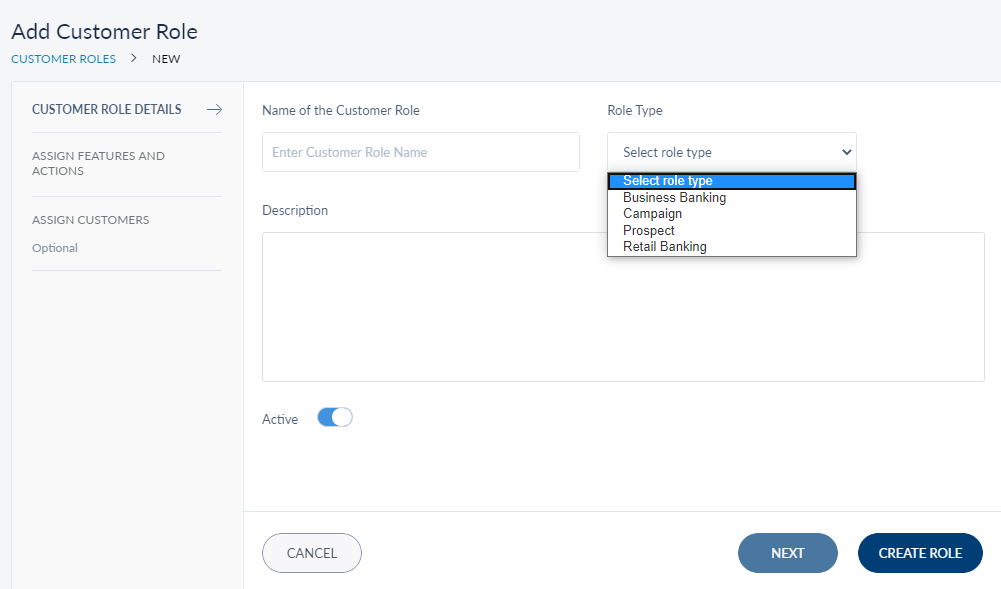
The Add Customer Role screen comprises three tabs to capture the required information - Customer Role Details, Assign Features and Actions, and Assign Customers.
NOTE:
- The Assign Customers tab is applicable only if the roles are Retail Business and Prospect.
The Assign Features and Actions tab is not applicable to Campaign.
Customer Role Details
Add the following details:
- Name of the Customer Role. Enter the name of the role. It is mandatory.
- Type. Select the role type from the list. The options are Campaign, Retail Business, Business Banking, and Prospect.
- If you select Business Banking, a list of Business Types appear.
Select the required business type to which this new role is associated. If you select the Set Role as Default option for any Business Type, the new role will be assigned to the new users who are enrolling into business banking from the online banking application.
NOTE: The Assign Customers tab is not applicable if the new role type is Business Banking.
- Description. Enter the description of the role. It is mandatory.
- Activate. By default, it is active. Slide to deactivate, if required. If deactivated, the role will not be displayed in the roles list.
- E-agreement Required. Inactive by default. Slide if e-agreement is required. This field is applicable only for business banking role type.
- You can proceed to assign permissions to the role by using the Next button or the Assign Customer Permissions tab (this step is optional) or save the role details directly. The role record is added to the list of roles.
Assign Features and Actions
The application displays a list of available features retrieved from the back-end database. The added features will list the actions mapped to it on the right pane. The mandatory actions are preselected and hence, cannot be modified. You can choose to select other actions, if required. The transactional actions can be modified to set limits for each transactions, daily, and weekly.
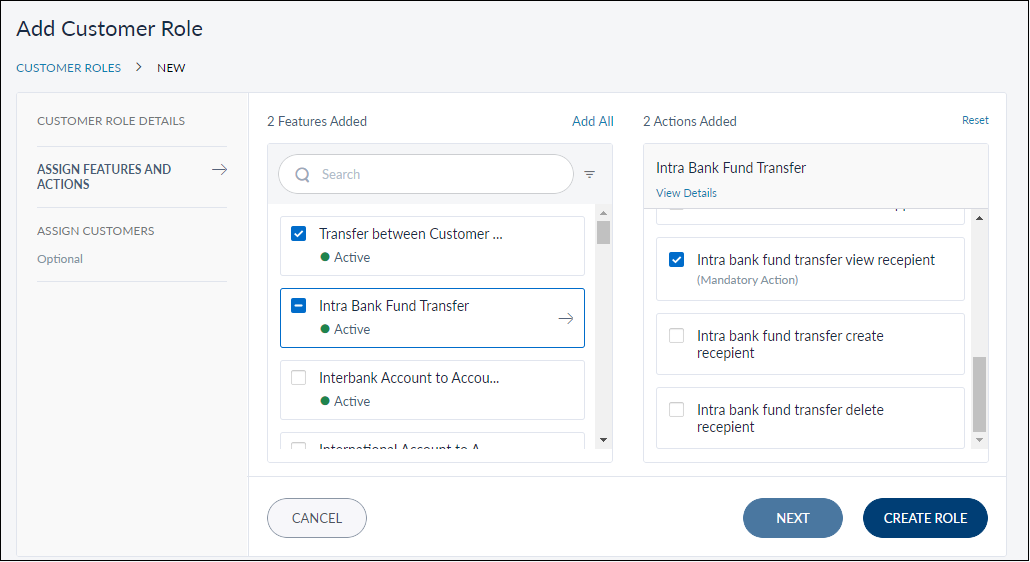
Do the following:
- From the list of available features, add the required features and actions. You can also use the Search option to search for any particular feature. You can select all the features at the same time using Add All in the Available features list section.
- The feature is added to the Selected features list. You can see the number of actions added in the selected feature list sections. To check the details of a feature added to the list, click the View Details button shown below a feature. A pop-up window is shown displaying the feature description and its associated actions.
- You can use the Reset option to reselect the features and actions.
- You can proceed to assign customers to the role by using the Next button or the Assign Customers tab (this step is optional) or select Create Role to save the user details directly. The role record is added to the list of roles. The Assign Customers tab is applicable only if the roles are Retail Business and Prospect.
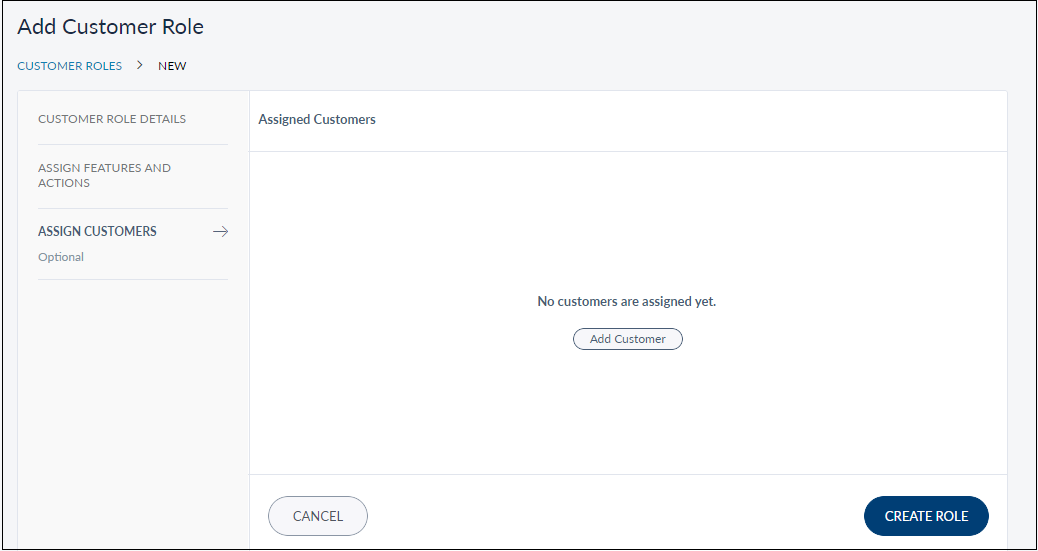
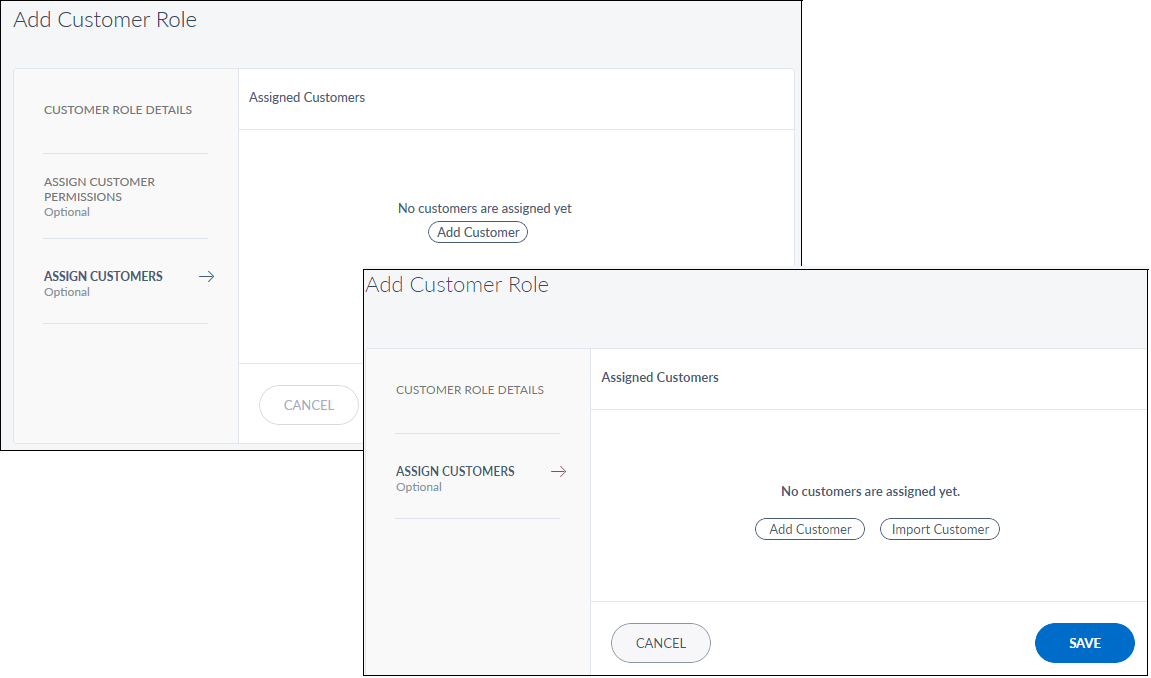
Assign Customers
This step is optional. Add existing customers to the role using the Add Customer button. Note that a customer can belong to multiple roles.
Do the following:
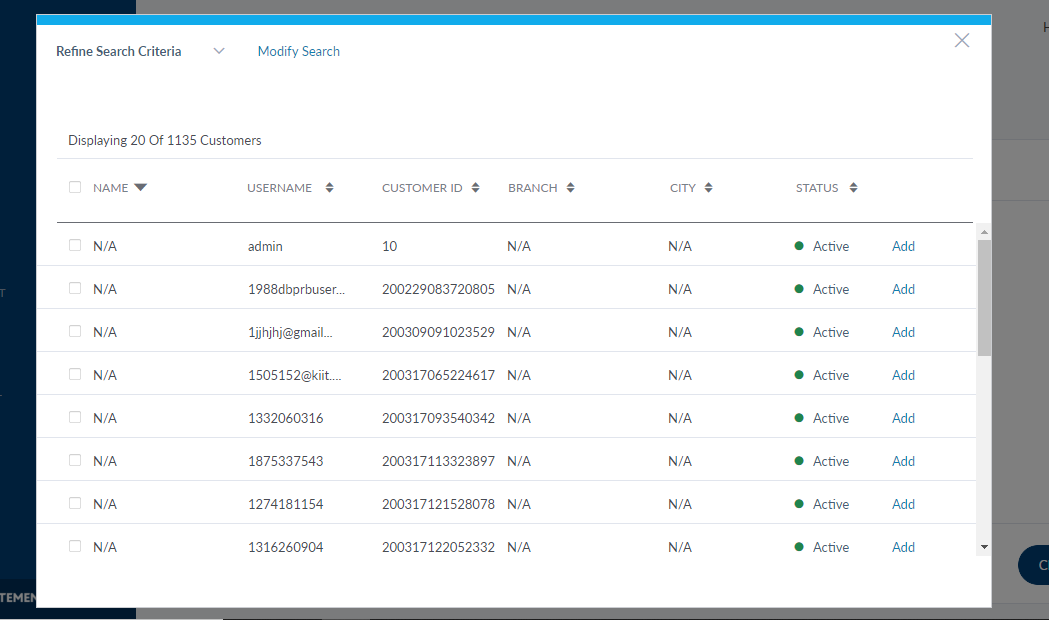
- Enter the search criteria (customer first name, ID, or username) in the search bar and click Search.
- You can use the advanced search options to further filter your search criteria.
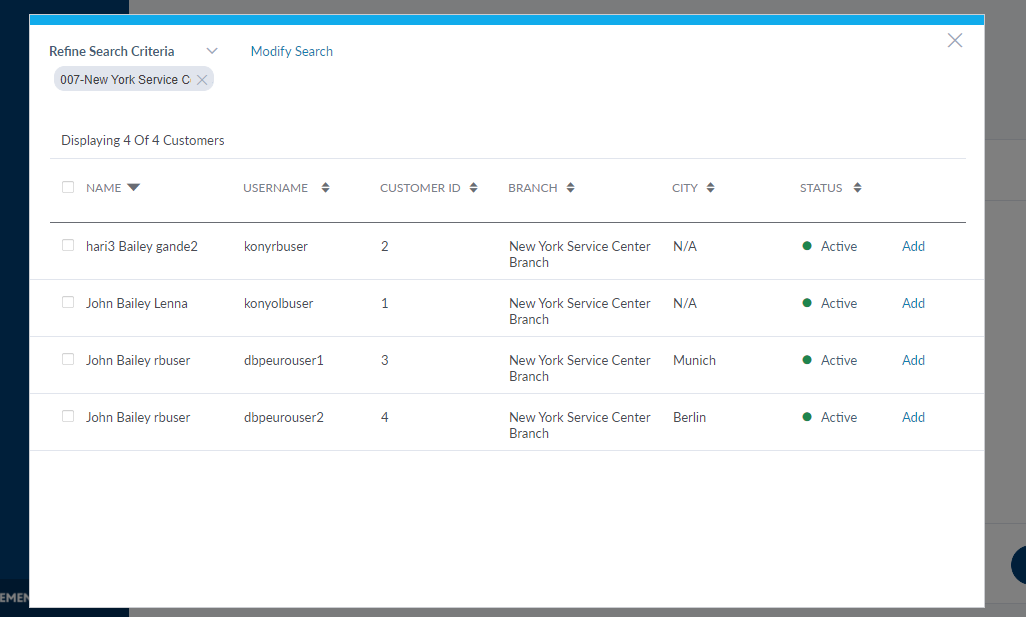
- The application displays the relevant search results list. The list contains the following details - Name, Username, Customer ID, Branch, City, and Status.
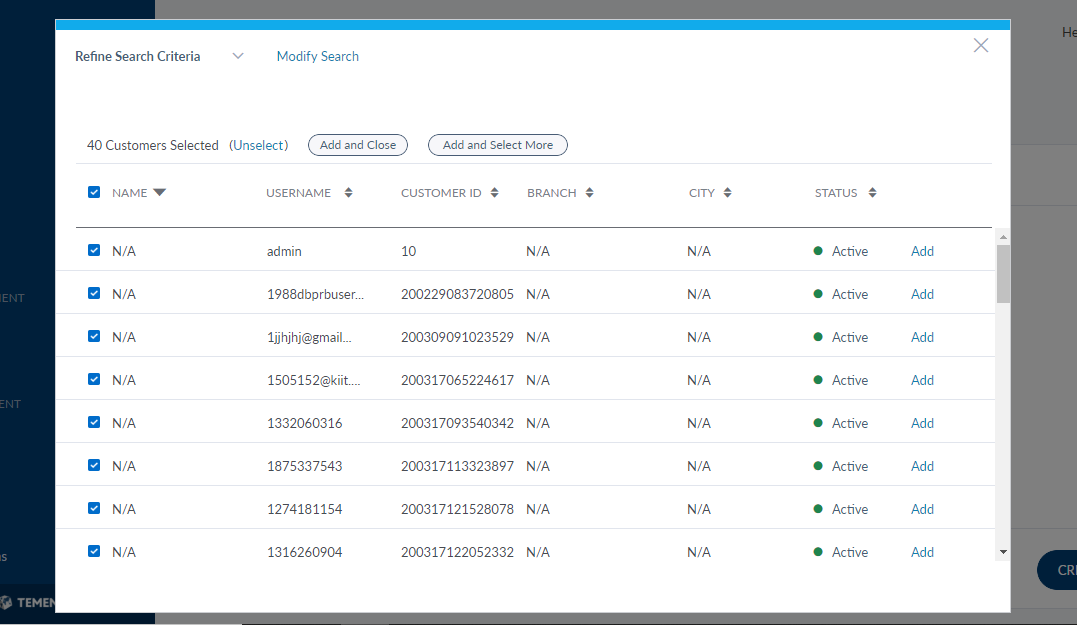
- You can do any of the following to select individual customers. Select the check box available on the Name column if you want to select all the customers listed in the search result.
- Select the required customer's row and click Add
- Select the required customer's row and click Add and Close
- Select the required customer's row and click Add and Select More as required.
- The selected customers are added to the assigned customers list.
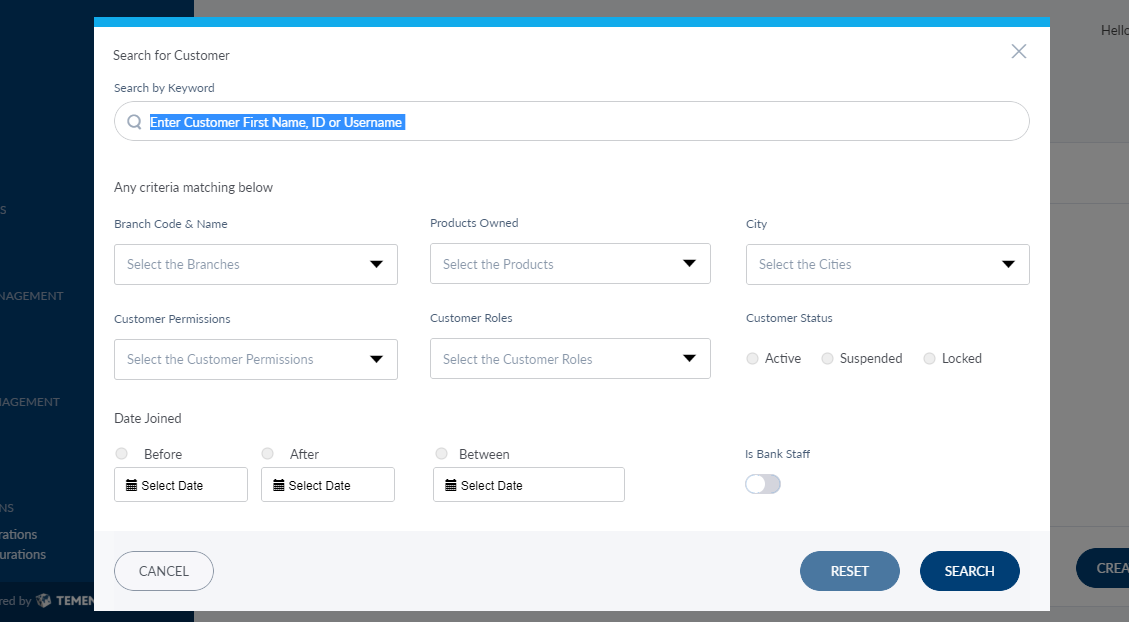
Click the Add Customer button to find a customer using various search criteria.
Search result shown based on the customer ID
You can either click Add and Close option to add the customers and create the role, or Add and Search More option for adding more customers.
NOTE:
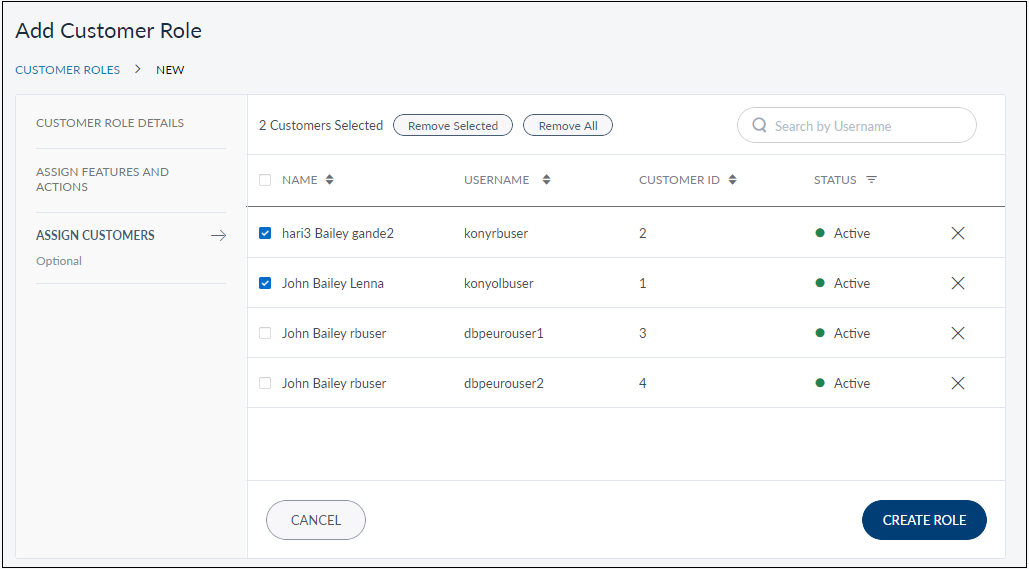
- Click Remove Selected if you want to clear all the selected customers.
- Click Modify Search if you want to change any search criteria.
- Click Add More if you want to add the customers to the customer role again.
In the Assign Customers screen, the customers' list is represented as rows with the following details - Name, Username, Customer ID, and Status. Click  to delete the record.
Save the details. The record is added to the list of role with status.
Add Multiple Customers to Campaign Role
NOTE: Adding multiple customers by importing a CSV file option is available for the Campaign role type only.
The users can add multiple customers to a targeted campaign by clicking the Import Customer option in the Assign Customer tab. A CSV file from a local folder can be imported. The file must contain mandatory fields information - Member/Customer ID and Member/Customer Name.
While the file may be large and take time to upload, the user is free to navigate to another section of the Spotlight application. An email is sent to the user once the file is uploaded.
For more information on campaign management, refer to Real Time Engagement (RTE).
Advanced Customer Search
Use the feature to search for the customers that match specific criteria such as branch code and name, products owned, city, permissions, roles, and customer status. You can also match the search criteria with dates that the customer has joined by specifying the required date criteria.
Search customer by bank branch ID
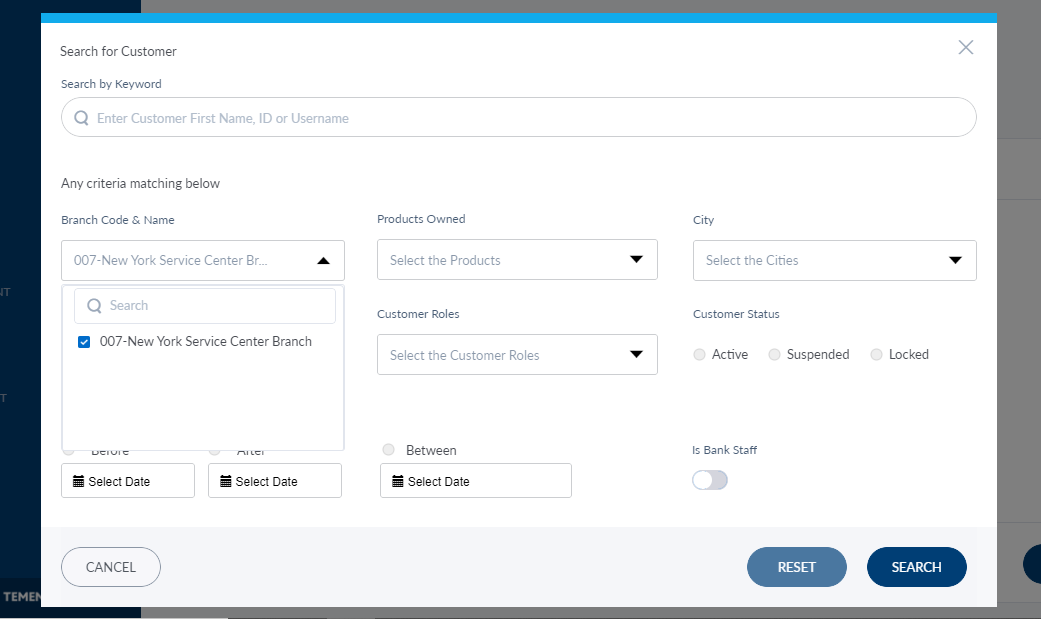
You can do any one or a combination of the following activities in the advanced search section:
- Select the appropriate branch or branches from the Branch Code &Name list.
- Select the appropriate product or products from the Products Owned list.
- Select the appropriate city or cities from the City list.
- Select an appropriate permission or permissions from the Customer Permissions list.
- Select the appropriate role or roles from the Customer Roles list.
- Select the required status (active, suspended, or locked) from Customer Status.
- Select the required date criteria (before, after, or between) from Date Joined and select the date or date range as required.
Click Search. The application displays all the customers based on the specified search criteria. You can add the required customers to the assigned customers list.
If you want to clear the current search, click Reset. The application removes the current search criteria.
View Role Details
Use the feature to view the details of the selected role record and edit the details if required.
Menu path: Customer Management > Customer Roles > Click a role row

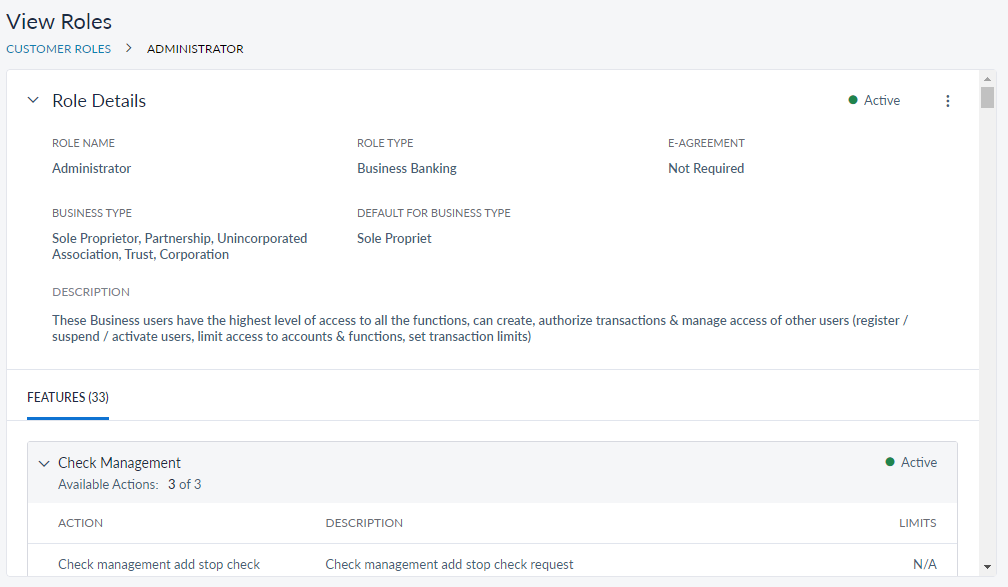
The application displays the following details on the View Customer Role screen:
- Role Name
- Role Type
- If E-agreement required or not.
- Status
- Business Type (applicable for Business Banking related roles)
- Default for Business Type (applicable for Business Banking related roles)
- Role Description
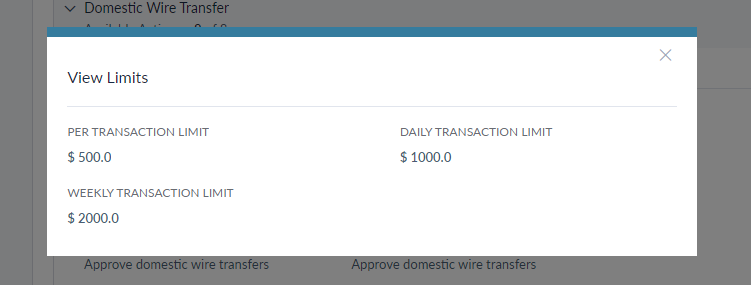
- The list of features names and respective description.
- The list of actions in each selected feature. If it is a transactional action, you can click the View button to see the limits.
- For the roles that are related to Retail Banking, a Customers tab is available. It lists the details of the customers who are assigned with this role.
Click Edit from the contextual menu to modify the details, if required.
Edit Role Details
Use the feature to edit the details of the selected role record.Menu path: Customer Management > Customer Roles > View Customer Role details screen > Edit
The edit screen is similar to the add a role screen with the provision to modify the details.
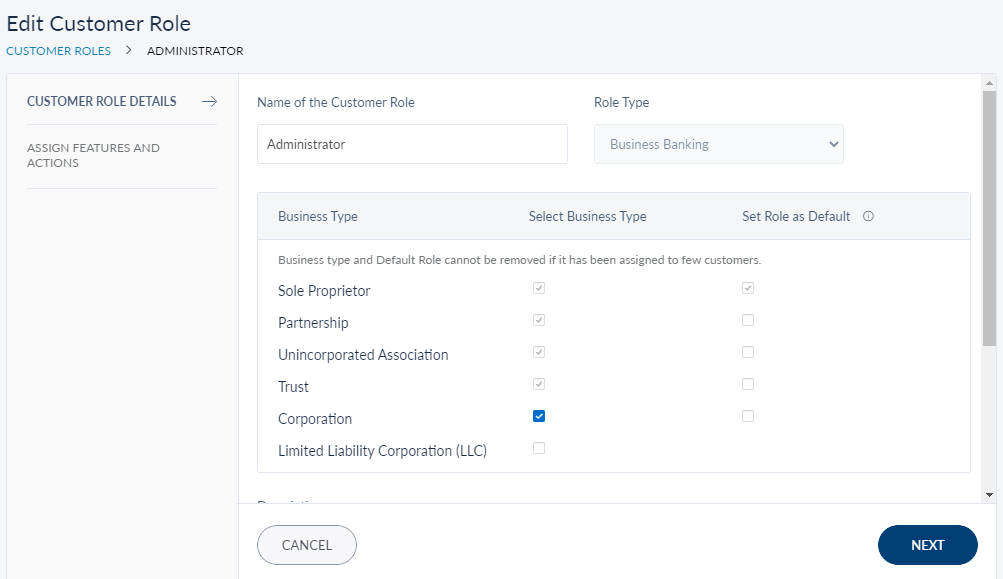
Make the changes as required:
- Name of the customer role
- Status
- Description
- Assign or remove features/actions
For Business Banking role type, you can associate a new business type with a role. You cannot remove a business type associated with the role if there are already existing businesses (of the same type) which are using this role. You can also change the default role associated with the business type.
Make the required changes on the Customer Role Details, Assign Customer Permissions, and Assign Customers tabs as required, and save the details.
NOTE: You can cancel the process at any time. The changes are not saved.
Search for a Role
Use the search option to search for a particular role using search criteria. You can also download the list of matching records as an excel file if required.
Menu path: Customer Management > Customer Roles > Search
Enter the search keyword (role name) in full or in part. The application displays the matching records automatically. Click Download List button to download the list of roles matching the search criteria as a CSV file if required. Click to clear the search field.
Update Role Status
Use the feature to update the status of a role.
Menu path: Customer Management > Customer Roles > Contextual Menu
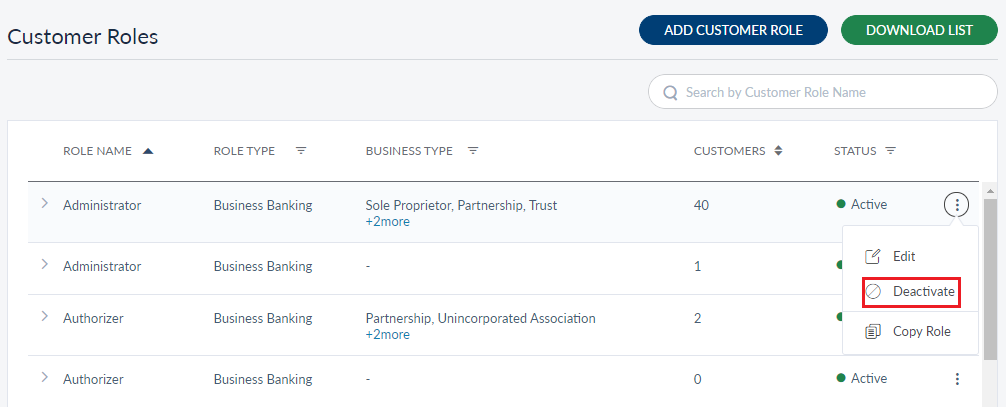
Click the contextual menu available on each row and update the status based on the current status of the customer role. The following statuses are available: Activate and Deactivate. For example, if the current status of a role is Active, you can Deactivate the role or vice versa.
NOTE: You cannot deactivate a role if it is assigned to customers.

On the confirmation screen, confirm the action.
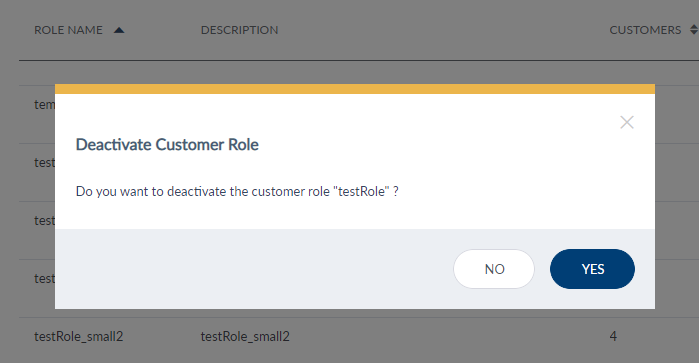
The status of the role is updated as required.
Copy a Role
Another way to create a role is to copy a role and make changes to the sections/tabs as required. From the contextual menu, select the Copy Role option. Copy Customer Role page will open with Customer Role Details tab. The details are prepopulated on the page with the existing customer role details. Make changes to the sections as per your requirement and select create.
NOTE: If you copy a role associated with Business Banking, that business types are copied but default role settings are not copied. This is so that the default setting will not be overridden by new roles when you copy a role.
Copying a role and making changes is similar to editing a role.
Add Bookmark
save your best linksView Bookmarks
Visit your best links BACK
BACK


Are you sure you want to log-off?